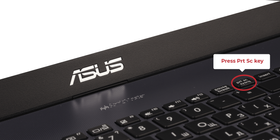
To take a screenshot on an Asus laptop, press the “Print Screen” button on your keyboard, usually labeled as “PrtScn” or “PrtSc.” Asus laptops are popular for their sleek designs and powerful performance.
Whether you want to capture a memorable moment, save important information, or troubleshoot an issue, knowing how to take a screenshot on your Asus laptop is essential. We will provide you with a quick and straightforward guide on how to easily screenshot on your Asus laptop.
By following these steps, you’ll be able to take screenshots effortlessly and efficiently, allowing you to capture and save whatever you need on your Asus laptop. So, let’s get started and learn how to master the art of screenshotting on your Asus laptop in no time.

Credit: www.wikihow.com
Built-in Methods
When it comes to taking screenshots on an Asus laptop, there are several built-in methods at your disposal. These methods can be utilised to capture anything from full screen images to specific sections of your screen with ease. In this blog post, we will explore these built-in methods for taking high-quality screenshots on your Asus laptop.
Using The Print Screen Button
The Print Screen button, often labeled as “PrtScn” or “PrtSc”, is a convenient way to capture the entire screen on your Asus laptop. Simply press the Print Screen button to take a screenshot of the entire display. The captured image will be copied to the clipboard, and you can paste it into image editing software or a document to save it. This method is quick and straightforward, making it ideal for capturing full-screen content.
Using The Snipping Tool
The Snipping Tool is another built-in feature that offers more flexibility for capturing specific sections of your screen. This tool allows you to select a custom area of the screen and save it as an image. To access the Snipping Tool, simply search for it in the Windows search bar or find it in the Start menu. Once open, click “New” and use the cursor to select the area you want to capture. You can then save the snip as an image file for easy access and sharing. The Snipping Tool is particularly useful for capturing specific windows, menus, or areas of interest on your Asus laptop.
Credit: screenrec.com
Using Keyboard Shortcuts
Capturing The Entire Screen
To capture the entire screen on an Asus laptop, press the PrtScn key. The screenshot will be saved automatically in the Screenshots folder.
Capturing A Specific Window
Press the Alt + PrtScn keys simultaneously to capture a specific window on your Asus laptop. The screenshot will be copied to the Clipboard for pasting.
Capturing A Specific Area
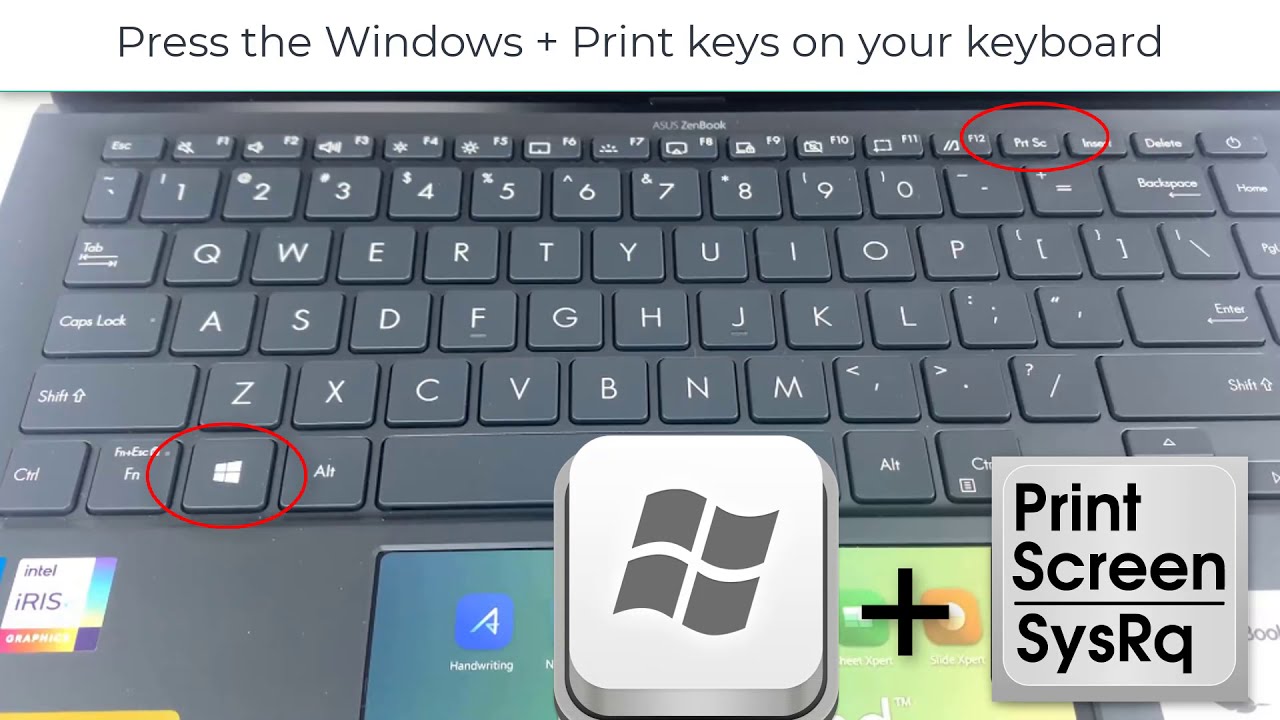
To capture a specific area, use the Windows + Shift + S keyboard shortcut. Drag the crosshair to select the desired area and the screenshot will be saved automatically.
Third-party Software
Learn how to capture screenshots on your Asus laptop using third-party software for easy and efficient image sharing. Enhance your productivity with these simple steps.
Overview Of Third-party Screenshot Tools
While Asus laptops come with built-in screenshot capabilities, some users may prefer more advanced features and versatility. This is where third-party screenshot software comes into play. By installing reliable screen-capture tools, Asus laptop owners can gain access to a wide range of additional features that can enhance their screenshot-taking experience.
Recommended Third-party Screenshot Software For Asus Laptop
When it comes to choosing the right third-party screenshot software for your Asus laptop, there are various options available. Here are some of the best tools:
| Software | Description | Benefits |
|---|---|---|
| Snagit | A popular screenshot tool that offers advanced editing options and workflow customization. |
|
| Lightshot | A lightweight and easy-to-use screenshot software that allows quick sharing of captured images. |
|
| Greenshot | A feature-rich screenshot tool that offers a range of annotation options and supports multiple output formats. |
|
When choosing a third-party screenshot software, it is important to consider your specific needs and preferences. Take the time to explore these recommended options to find the software that best suits your requirements and enhances your screenshot-taking experience on your Asus laptop.
Editing And Saving Screenshots
When it comes to capturing and sharing information, screenshots are a go-to solution for many users. However, capturing the image is just the first step – you often need to edit and save your screenshot in a suitable format. Knowing how to effectively edit and save your screenshots is crucial for ensuring they fulfill their purpose. In this article, we’ll explore how to leverage the editing tools on your Asus laptop to enhance your screenshots and choose the most appropriate image format for saving them.
Built-in Editing Tools
Asus laptops come equipped with built-in editing tools that allow users to make quick adjustments to their screenshots. Once you have captured the desired image, you can utilize these tools to add annotations, highlights, or blur certain areas to protect sensitive information. The editing tools make it effortless to customize your screenshots according to your specific needs, saving you time and effort.
Choosing The Suitable Image Format
After editing your screenshot, it’s crucial to choose the most suitable image format for saving it. Different formats have varying levels of compression and quality, so selecting the right one is essential for retaining clarity and reducing file size. By understanding the characteristics of common image formats such as PNG, JPEG, and GIF, you can ensure your screenshots are saved in the most appropriate format for their intended use.
Sharing And Using Screenshots
Screenshots are a valuable tool for capturing and sharing important information or moments. Once you’ve captured the image on your Asus laptop, there are several ways to make the most of your screenshots, from sharing them on social media to incorporating them into presentations or documents.
Sharing On Social Media
Step 1: After taking a screenshot, locate the image file in your laptop’s files.
Step 2: Open your preferred social media platform and create a new post or message.
Step 3: Attach the screenshot by clicking the upload button and selecting the file.
Utilizing Screenshots In Presentations Or Documents
Incorporating screenshots into presentations or documents can enhance the visual appeal and provide clear illustrations of your points. Here’s how you can do it:
- Insert the screenshot directly into your document or presentation slide.
- Resize and position the screenshot to fit your content seamlessly.
- Use annotations or callout features to highlight specific areas or details within the screenshot.
Credit: softkeys.uk
Frequently Asked Questions On How To Screenshot On Asus Laptop
How Do You Take A Screenshot On A Laptop Asus?
To take a screenshot on an Asus laptop, press the “PrtSc” or “Print Screen” key on your keyboard. Then, open an image editing software like Paint and press “Ctrl + V” to paste the screenshot. Finally, save the image as desired.
How Do I Capture A Screenshot On My Laptop?
To capture a screenshot on your laptop, press the “Print Screen” or “PrtScn” button on your keyboard. Then, open an image editing program, like Paint, and press “Ctrl+V” to paste the screenshot. Finally, save the image by clicking “File” and selecting “Save.
“
How Do You Take A Partial Screenshot On An Asus Laptop?
To take a partial screenshot on an Asus laptop, press “Windows + Shift + S” keys simultaneously. Select the area you want to capture, then it will be saved to the clipboard.
How Do You Screenshot On An Asus Chromebook Laptop?
To screenshot on an Asus Chromebook laptop, press the “Ctrl” and “Show Windows” keys simultaneously.
Conclusion
Now that you’ve mastered the art of taking screenshots on your Asus laptop, capturing important moments is just a keystroke away. Whether you need to save images, share information, or troubleshoot tech issues, this simple skill will always come in handy.
Keep snapping away!
