To remove laptop RAM, locate the RAM compartment, push the locking mechanism to release the RAM, and gently pull it out. Removing laptop RAM is a simple process that can be done with minimal effort.
Upgrading RAM can enhance the overall performance of the laptop, making it faster and more efficient. It is important to ensure that the laptop is turned off and unplugged before attempting to remove the RAM. Additionally, it is recommended to wear an anti-static wristband to prevent any damage caused by static electricity.
We will discuss the step-by-step process of removing laptop RAM and provide tips to avoid any potential damage.
Credit: www.dummies.com
Introduction To Laptop Ram Upgrades
Upgrade your laptop’s RAM by learning how to remove and replace the existing modules. Boost your system’s performance with this simple hardware upgrade. Follow these steps to safely remove and upgrade your laptop’s RAM for improved speed and multitasking capabilities.
Why Upgrade Your Ram?
Upgrading your laptop’s RAM can significantly improve its performance, allowing it to run more smoothly and handle multiple tasks at once.
With more RAM, you can open and switch between applications faster, reduce lag while multitasking, and experience improved overall system responsiveness.
Identifying Your Laptop’s Ram Requirements
Before upgrading your laptop’s RAM, it’s essential to identify the specific type and capacity of RAM modules that are compatible with your device.
You can typically find this information in your laptop’s user manual or by visiting the manufacturer’s website to view the supported RAM specifications.

Credit: www.youtube.com
Safety Precautions Before You Start
Turning Off Your Laptop
1. Power off your laptop completely before starting the process.
Grounding Yourself To Avoid Static Damage
2. Prevent static damage by grounding yourself properly.
Locating The RAM in Your Laptop
Before you can remove the RAM from your laptop, it’s essential to know where it’s located. The RAM (Random Access Memory) is a crucial component that allows your laptop to perform multiple tasks simultaneously. By following these steps, you’ll be able to locate the RAM compartment in your laptop.
Tools Needed For The Job
- Screwdriver
- Anti-static wrist strap
Finding The Ram Compartment
Each laptop model may have a slightly different design, but the general process of locating the RAM compartment remains the same. Follow these steps:
- Turn off your laptop and unplug it from any power source.
- Flip your laptop over and place it on a flat surface.
- Use a screwdriver to remove the screws on the bottom panel of your laptop.
- Once the screws are removed, carefully remove the bottom panel.
- Look for a rectangular-shaped compartment that houses the RAM. It is usually labeled or marked with a RAM symbol.
- Identify the RAM sticks inside the compartment. They are small, rectangular-shaped modules attached to the motherboard.
Once you have located the RAM compartment and identified the RAM sticks, you can proceed with removing them from your laptop. Remember to handle the RAM sticks with care and use an anti-static wrist strap to avoid any damage caused by static electricity.

Credit: www.ifixit.com
Step-by-step Guide To Removing Ram
Are you looking to upgrade your laptop’s RAM? In this step-by-step guide, we’ll walk you through the process of removing the RAM module. Follow these simple instructions to safely release the clips and remove the RAM module from your laptop.
Releasing The Clips
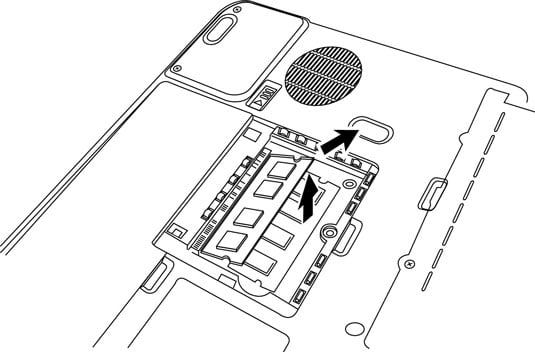
First, ensure your laptop is powered off and disconnected from any power source. Locate the RAM compartment, usually found underneath the laptop. Gently push the clips on either side of the RAM module outward to release it from the slot.
Safely Removing The Ram Module
Once the clips are released, carefully grip the edges of the RAM module and gently pull it out of the slot. Be mindful of any resistance, and avoid using excessive force. Place the removed RAM module in an anti-static bag to prevent damage from static electricity.
Troubleshooting Common Issues
To troubleshoot common issues with removing laptop RAM, follow these simple steps. First, power off the laptop and disconnect all cables. Then, locate the RAM compartment, press the clips to release the RAM, and gently remove it. Finally, insert the new RAM module and secure it in place.
Troubleshooting Common Issues: How to Remove Laptop RAM
Removing RAM from a laptop is a relatively simple process, but it can sometimes encounter problems. In this section, we’ll discuss some of the common issues you may face while removing RAM from your laptop and how to troubleshoot them.
If the RAM Doesn’t Eject
If you’re having difficulty ejecting the RAM from your laptop, try the following:
– Ensure that you’ve released all the latches holding the RAM in place. Make sure there are no screws or other obstructions that may be preventing you from removing the RAM.
– Gently wiggle the RAM module back and forth while pulling it out. Be careful not to use too much force as you could damage the module or the slot.
– If it still won’t come out, try using a small flathead screwdriver to gently pry the RAM module out. Be very careful not to damage any of the surrounding components.
Ensuring Proper RAM Removal
To avoid any problems, make sure you follow these steps to remove your laptop RAM correctly:
1. Shut down your laptop and unplug it from any power sources.
2. Remove the battery from your laptop.
3. Locate the RAM compartment on your laptop. It is usually located on the bottom of the laptop and is held in place by one or more screws.
4. Remove the screws and carefully lift the cover off the RAM compartment.
5. Locate the RAM module and gently push the latches holding it in place to the sides.
6. Gently pull the RAM module out of the slot at a 45-degree angle.
It’s important to remember that RAM is delicate and can be easily damaged. Always handle it with care and avoid touching the gold connectors on the bottom of the module.
In conclusion, removing RAM from your laptop is a simple process, but it can sometimes encounter problems. By following the steps we’ve outlined and troubleshooting any issues that arise, you can ensure that your RAM is removed safely and without causing any damage to your laptop.
After Ram Removal: Next Steps
Discover the essential steps to remove laptop RAM effectively. Learn how to safely handle and replace RAM for optimal performance.
Cleaning The Ram Slot
Use a can of compressed air to blow out any dust or debris from the RAM slot.
Preparing For New Ram Installation
Handle the new RAM carefully by its edges and align it correctly before gently pushing it into the slot.
Refer to the laptop’s manual for specific instructions on installing the new RAM.
Remove Laptop RAM
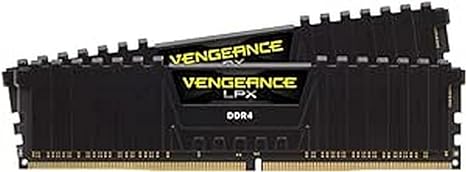
1. Corsair VENGEANCE LPX DDR4 RAM 32GB (2x16GB) 3200MHz CL16 Intel XMP 2.0 Computer Memory – Black (CMK32GX4M2E3200C16)
| Brand | Corsair |
| Computer Memory Size | 32 GB |
| RAM Memory Technology | DDR4 |
| Memory Speed | 3200 MHz |
| Compatible Devices | Intel 300 Series,Intel 400 Series,Intel 500 Series,Intel 400 Series,Intel 500 Series,Intel X299 |
About this item
- Hand-sorted memory chips ensure high performance with generous overclocking headroom
- VENGEANCE LPX is optimized for wide compatibility with the latest Intel and AMD DDR4 motherboards
- A low-profile height of just 34mm ensures that VENGEANCE LPX even fits in most small-form-factor builds
- A solid aluminum heatspreader efficiently dissipates heat from each module so that they consistently run at high clock speeds
- Supports Intel XMP 2.0 for simple one-setting installation and setup
- Available in multiple colors to match the style of your system
- Overclocking overhead is limited by operating temperature. The unique design of the VENGEANCE LPX heat spreader optimally pulls heat away from the ICs and into your system’s cooling path, so you can push it harder
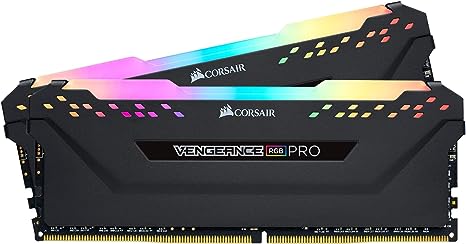
2. Corsair VENGEANCE RGB PRO DDR4 32GB (2x16GB) 3600MHz CL18 Intel XMP 2.0 iCUE Compatible Computer Memory – Black (CMW32GX4M2D3600C18)
| Brand | Corsair |
| Computer Memory Size | 32 GB |
| RAM Memory Technology | DDR4 |
| Memory Speed | 3600 MHz |
| Compatible Devices | Desktop |
About this item
- High performance DDR4 memory illuminates your system with vivid, animated lighting from ten ultra-bright, individually addressable RGB LEDs per module.
- Take control with CORSAIR iCUE software and synchronize lighting across all your CORSAIR iCUE compatible products, including memory, fans, coolers, keyboards and more.
- Customize lighting profiles with millions of different patterns and colors, or create your own in CORSAIR iCUE software.
- Compatible with Intel and AMD DDR4 motherboards.
- Requires no extra wires or cables for a clean and seamless install.
- Custom performance PCB for the highest signal quality and performance stability.
- Carefully screened ICs for extended overclocking potential.
- Built-in aluminum heat spreader provides superb memory cooling even when overclocked.
- Supports Intel XMP 2.0 for simple one-setting installation and optimum performance.

3. Crucial Pro RAM 32GB Kit (2x16GB) DDR4 3200MT/s (or 3000MT/s or 2666MT/s) Desktop Memory CP2K16G4DFRA32A
| Brand | Crucial |
| Computer Memory Size | 32 GB |
| RAM Memory Technology | DDR4 |
| Memory Speed | 3200 MT/s |
| Compatible Devices | Desktop |
About this item
- Plug-and-play high performance. Downclock capable for systems that only support 3000MT/s or 2666MT/s
- Universal compatibility. Compatible with 8th–13th Gen Intel Core or AMD Ryzen 1000–5000 Series desktop CPUs
- Supports Intel XMP 2.0 to recover memory speed if the CPU suppresses it in 4 DIMM configurations
- Game at higher frame rates, multitask better, enhance productivity, save time and money
- ECC type = non-ECC, form factor = UDIMM, pin count = 288-pin, PC speed = PC5-25600, voltage = 1.2V, rank and configuration = 2Rx8 or 1Rx8

4. Corsair VENGEANCE RGB PRO DDR4 16GB (2x8GB) 3200MHz CL16 Intel XMP 2.0 iCUE Compatible Computer Memory – Black (CMW16GX4M2C3200C16)
| Brand | Corsair |
| Computer Memory Size | 16 GB |
| RAM Memory Technology | DDR4 |
| Memory Speed | 3200 MHz |
| Compatible Devices | Desktop |
About this item
- High performance DDR4 memory illuminates your system with vivid, animated lighting from ten ultra-bright, individually addressable RGB LEDs per module.
- Take control with CORSAIR iCUE software and synchronize lighting across all your CORSAIR iCUE compatible products, including memory, fans, coolers, keyboards and more.
- Customize lighting profiles with millions of different patterns and colors, or create your own in CORSAIR iCUE software.
- Compatible with Intel and AMD DDR4 motherboards.
- Requires no extra wires or cables for a clean and seamless install.
- Custom performance PCB for the highest signal quality and performance stability.
- Carefully screened ICs for extended overclocking potential.
- Built-in aluminum heat spreader provides superb memory cooling even when overclocked.
- Supports Intel XMP 2.0 for simple one-setting installation and optimum performance.
- Limited Lifetime warranty provides complete peace of mind.
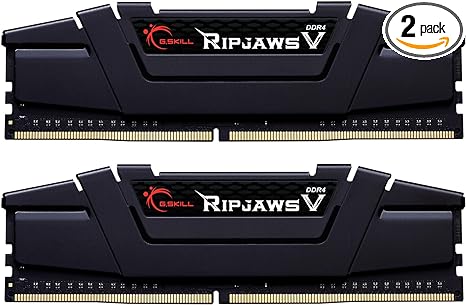
5. G.SKILL Ripjaws V Series (Intel XMP) DDR4 RAM 16GB (2x8GB) 3200MT/s CL16-18-18-38 1.35V Desktop Computer Memory UDIMM – Black (F4-3200C16D-16GVKB)
| Brand | G.Skill |
| Computer Memory Size | 16 GB |
| RAM Memory Technology | DDR4 |
| Memory Speed | 3200 MT/s |
| Compatible Devices | Desktop |
About this item
- RipJaws V Series, designed specifically for AMD Ryzen X470, X570, B450, B550; Intel Z170, Z270 and newer.
- 16GB kit containing 2 x 8GB modules, DDR4-3200, 288-Pin, CAS Latency CL16 (16-18-18-38) at 1.35V (Intel XMP)
- Brand: G.SKILL, Series: RipJaws V, Model: F4-3200C16D-16GVKB
- ECC: No, Dual Channel Kit, Recommended Use: High Performance or Gaming Memory
- XMP profile support to reach up to the rated overclock speed, or run at default JEDEC profile speed
- Rated XMP frequency & stability depends on MB & CPU capability
- Check G.Skill QVL or RAM Configurator on the G.Skill website for validated motherboards
- Do not mix memory kits. Memory kits are sold in matched kits that are designed to run together as a set. Mixing memory kits will result in stability issues or system failure.
6. Crucial RAM 64GB Kit (2x32GB) DDR4 3200MHz CL22 (or 2933MHz or 2666MHz) Laptop Memory CT2K32G4SFD832A
| Brand | Crucial |
| Computer Memory Size | 64 GB |
| RAM Memory Technology | SO-DIMM |
| Memory Speed | 3200 MHz |
| Compatible Devices | Laptop, PC |
About this item
- 3200MHz RAM can downclock to 2933MHz or 2666MHz if system specification only supports 2933MHz or 2666MHz
- Improve your system’s responsiveness, run apps faster and multitask with ease
- Compatibility assurance when using the Crucial System Scanner or Crucial Advisor Tool
- Micron quality and reliability is backed by superior component and module level testing and 42 years of memory expertise
- ECC Type = Non-ECC, Form Factor = SODIMM, Pin Count = 260-pin, PC Speed = PC4-25600, Voltage = 1.2V, Rank and Configuration = 2Rx8
Frequently Asked Questions
Is Laptop Ram Removable?
Yes, laptop RAM is removable. It is usually located under a panel on the bottom of the laptop and can be easily replaced or upgraded by removing the old RAM and inserting the new one. However, it is important to check the laptop’s manual or manufacturer’s website for specific instructions and compatible RAM types.
How Do I Release Ram From My Laptop?
To release RAM from your laptop, close unused programs and restart your computer. Upgrade your RAM if needed for better performance.
How To Unclip Ram?
To unclip RAM, gently press down on the clips at either end until they release. Carefully remove the RAM module from the slot. Make sure to handle the RAM module by its edges and avoid touching the gold contacts.
How To Locate Ram On Laptop?
Locating RAM on a laptop is easy. First, power off the laptop and remove the back panel. Look for a small rectangular chip on the motherboard – that’s the RAM.
Conclusion
Removing laptop RAM is a straightforward process that can greatly enhance your device’s performance. By following the steps outlined in this guide, you can safely and easily upgrade or replace your laptop’s memory. Remember to power off your laptop, ground yourself, and handle the RAM sticks carefully.
With the right tools and a little patience, you can successfully remove and install laptop RAM without any issues. So go ahead and give your laptop the boost it deserves!
