To take a screenshot on an HP laptop, hold down the Windows key and the Print Screen key simultaneously. A screenshot will be saved in the Screenshots folder.
Capturing screenshots on your HP laptop is a quick and simple process. Whether you need to save important information, share your screen with others, or keep a record of something visual, knowing how to take screenshots can be very useful.
By following a few easy steps, you can capture an image of your entire screen or just a portion of it. In this guide, we’ll explore the different methods you can use to screenshot on an HP laptop. Whether you’re a student, professional, or casual user, mastering this skill will enhance your productivity and make tasks like documenting errors, saving images, or sharing content more efficient. Let’s dive into the details of how you can easily capture screenshots on your HP laptop.

Credit: www.quora.com
Choosing The Right Method For Screenshot
Learn how to easily take a screenshot on your HP laptop by choosing the right method. Master the art of capturing your screen with simple steps and never miss a moment.
Using The Print Screen Key
Taking a screenshot on an HP laptop can be done using the Print Screen key. Pressing this key captures the entire screen at once.
For a more specific screenshot, the Snipping Tool can be used on HP laptops. This tool allows you to select and capture a portion of the screen.
Mastering Print Screen Key
Mastering the Print Screen Key on your HP laptop is essential for capturing screenshots effortlessly. Whether you want to save funny memes, important information, or capture a specific moment on your screen, understanding how to utilize the Print Screen Key will greatly benefit you. In this guide, we will explore the functions of the Print Screen Key and provide step-by-step instructions on how to use it effectively. So, let’s dive in and become a pro at taking screenshots on your HP laptop!
Understanding The Function Of Print Screen Key
The Print Screen Key, also known as PrtSc or PrtScr, is a useful button located on your HP laptop keyboard. As the name implies, this key allows you to capture an image of your entire screen or a specific window. When you press the Print Screen Key, it saves the screenshot to your clipboard, allowing you to paste it into an image editing software or document of your choice.
On some HP laptops, you might find the Print Screen Key labeled as “PrtScn” or have it combined with other keys, such as “Fn” or “Ctrl.” However, the functionality remains the same – capturing screenshots. Understanding this function is crucial as it forms the basis for effortless screen capture on your HP laptop.
Using The Print Screen Key
To take a screenshot using the Print Screen Key, follow these simple steps:
-
- Start of List Item 1
- Identify the Print Screen Key on your HP laptop keyboard.
Start of List Item 2
-
- Make sure the content you want to capture is visible on your screen.
Start of List Item 3
-
- Press the Print Screen Key once to capture the entire screen.
Start of List Item 4
-
- If you want to capture only the active window, press Alt + Print Screen Key simultaneously.
Start of List Item 5
- The captured screenshot is now stored in your clipboard.
Utilizing The Snipping Tool
The Snipping Tool is a versatile and convenient feature that allows you to capture and save screenshots on your HP laptop. Whether you want to capture an entire window, a specific area, or just a part of the screen, the Snipping Tool can be your go-to tool. In this section, we will explore how to utilize the Snipping Tool effectively on your HP laptop.
Introduction To Snipping Tool
The Snipping Tool is a built-in screenshot tool that comes pre-installed on your HP laptop. This tool provides four different snip types, including Free-form Snip, Rectangular Snip, Window Snip, and Full-screen Snip. Each snip type has its own unique functionality, allowing you to capture different areas of the screen effortlessly.
Customizing Snip Type And Delay
One of the great features of the Snipping Tool is the ability to customize the snip type and delay. To access these options, simply open the Snipping Tool and click on the “New” button. From here, you can select the desired snip type from the drop-down menu. If you often use a specific snip type, you can also set it as the default snip type for quicker access in the future.
In addition to customizing the snip type, you can also adjust the delay before capturing a snip. This is particularly useful when you want to capture a screenshot of a context menu or a tooltip that disappears quickly. By setting a delay, you can have enough time to open the menu or hover over the tooltip before the snip is taken.

Credit: pcsite.co.uk
Organizing And Editing Screenshots
When it comes to organizing and editing screenshots on your HP laptop, it’s essential to know the right tools and techniques. Efficiently managing your screenshots and making basic edits can streamline your workflow and help you stay organized.
Saving And Organizing Screenshots
To keep your screenshots well-organized, create folders by categories or projects. Naming each folder descriptively helps in quick retrieval.
- Create a folder on your desktop or in the Documents section.
- Organize screenshots by date or subject for easy access.
Basic Editing With Snipping Tool
The built-in Snipping Tool on Windows allows you to perform basic edits on your screenshots. Access the Snipping Tool through the Start menu for convenience.
- Capture a region of the screen you want to edit.
- Annotate the screenshot with text, arrows, or shapes.
- Save the edited screenshot in your preferred format.
Exploring Advanced Screenshot Options
Exploring Advanced Screenshot Options can enhance your productivity and flexibility when capturing images on your HP laptop. While the basic screenshot functions are convenient, delving into advanced options can further elevate your user experience. From third-party tools to full page screenshot capture, uncovering these features can empower you to efficiently capture the content you need.
Utilizing Third-party Screenshot Tools
To expand your screenshot capabilities, consider utilizing third-party screenshot tools. These tools often offer advanced functionalities such as delayed screenshot capture, customizable keyboard shortcuts, and annotation features. By incorporating these tools into your workflow, you can tailor your screenshot process to best suit your needs.
Taking Full Page Screenshots
Capture complete web pages and lengthy documents by mastering the art of taking full page screenshots. This feature ensures that no vital information is left out, providing you with a comprehensive image of the content you wish to capture.
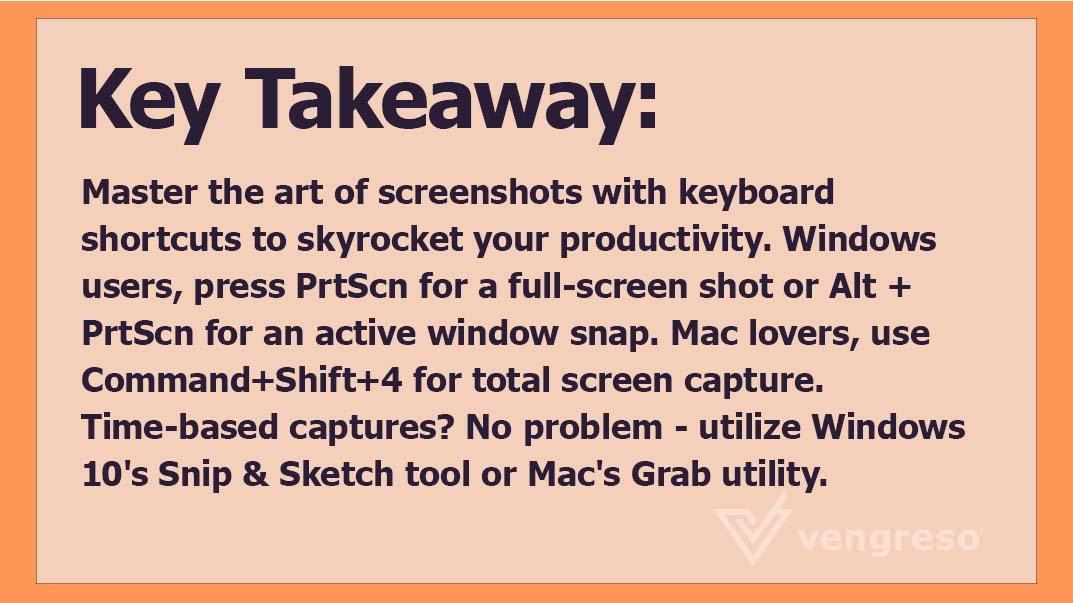
Credit: vengreso.com
Troubleshooting And Tips
When it comes to taking screenshots on your HP laptop, troubleshooting common issues and utilizing tips for efficient screenshotting can make the process seamless. Below, we’ll delve into some useful pointers to help you navigate through any challenges you may encounter.
Dealing With Common Screenshot Issues
If you face difficulties in capturing screenshots on your HP laptop, you’re not alone. Here are some common issues and their troubleshooting steps:
- Blank or Black Screenshots: Adjust the display settings and ensure the content you want to capture is visible before taking the screenshot.
- Unresponsive Screenshot Tools: Restart your computer and check for any pending updates for the screenshot tool to function properly.
- Failure to Save Screenshots: Verify the destination folder and the file format for saving the screenshots. Sometimes, changing the folder or format can resolve this issue.
Tips For Efficient Screenshotting
To streamline your screenshotting process, consider the following tips:
- Use Keyboard Shortcuts: Familiarize yourself with the keyboard shortcuts for taking screenshots, such as using “PrtScn” or “Fn + PrtScn” for specific captures.
- Organize Your Screenshots: Create a dedicated folder for your screenshots to ensure easy access and management of captured images.
- Utilize Snipping Tool or Snip & Sketch: Explore the built-in tools on Windows operating systems, such as Snipping Tool or Snip & Sketch, for advanced screenshot editing features.
Frequently Asked Questions On How To Screenshot On Hp Laptop
How Do You Take Screenshots On An Hp Laptop?
To take screenshots on an HP laptop, press the “PrtScn” key. Or use “Windows key + PrtScn” to save to the Screenshots folder.
How Do I Take A Screenshot On My Laptop?
To take a screenshot on your laptop, press the “PrtScn” key. On some laptops, you may need to use the “Fn” key as well. The screenshot will be saved to your clipboard, and you can paste it into a program like Paint to save it as an image file.
How Do You Screenshot On A Hp Laptop Without Prtscn?
To screenshot on a HP laptop without PrtScn, use the “Windows + Shift + S” shortcut. Select the area to capture and save it to the clipboard or a file.
Where Is Screenshot Button On Hp Keyboard?
The screenshot button on an HP keyboard is typically located in the top row, labeled “Print Screen” or “PrtScn. “
Conclusion
In a few simple steps, you can master the art of capturing screenshots on your Hp laptop. Practice makes perfect, so don’t hesitate to try it out. With this tool under your belt, sharing information visually will be a breeze.
Start screenshotting like a pro today!

Pingback: How to Take Screenshots on an HP Laptop: Step-by-Step Guide Of 2024?