To screenshot on a Dell laptop, press the “PrtScn” key; then paste the image into a program like Paint. Capturing your screen on a Dell laptop is a simple process that can be useful for various tasks.
Screenshots can help you capture important information, share images with others, or troubleshoot technical issues. Whether you want to save a picture, document an error message, or extract a specific section of your screen, knowing how to take a screenshot on your Dell laptop is a valuable skill.
In this guide, we will explore the step-by-step process to capture screenshots on your Dell laptop effortlessly. Let’s dive in and learn how to screenshot on your Dell laptop for better productivity and communication.
Credit: www.free-power-point-templates.com
Preparing To Screenshot
Capture your screen effortlessly on your Dell laptop with these simple steps. Learn how to screenshot and save important information or memorable moments with ease.
$p Reay to shoot on your Dell aptop? Let’s get started with some preparatory steps to ensure efficincy and precision.
Adjusting Your Screen
- Diminish brightnes or adjust color settings for accurate shots.
- Arrange Sreens so content is clearly visible in the capture.
- Check display resolution for optimum image quality.
Organizing Your Workspace
- Clear clutter from screen to avoid distraction in snipping process.
- Ensure needed Wnndow’s are open and orderly for effective workflow.
- Close unnecessary programs to declutter the screen space.

Credit: gadgetmates.com
Built-in Screenshot Tools
If you own a Dell laptop, capturing screenshots has never been easier, thanks to the built-in screenshot tools. These tools allow you to quickly capture and save images of your screen, making it convenient for various purposes like saving important information, reporting bugs, or sharing content. In this section, we will explore two different screenshot methods provided by Dell: utilizing the Windows Snipping Tool and using Dell’s Screenshot Shortcuts. Let’s dive in!
Utilizing Windows Snipping Tool
One of the easiest ways to capture screenshots on your Dell laptop is by utilizing the Windows Snipping Tool, which comes pre-installed with most Windows operating systems. This handy tool offers different snipping modes, including Free-form, Rectangular, Window, and Full-screen, allowing you to choose the perfect mode for your specific needs.
To access the Snipping Tool, simply follow these steps:
- Click on the “Start” button located in the bottom left corner of your screen.
- Type “Snipping Tool” in the search bar.
- Click on the Snipping Tool app when it appears in the search results.
Once the Snipping Tool window opens, you can select the desired snipping mode by clicking on the “Mode” button. After selecting your preferred mode, click and drag your cursor to capture the desired area. Once captured, you can save, edit, or share the screenshot directly from the Snipping Tool.
Using Dell’s Screenshot Shortcuts
If you prefer a more streamlined approach to capturing screenshots, Dell provides built-in screenshot shortcuts that allow you to capture your screen with just a few keystrokes. These shortcuts are not only efficient but also time-saving, especially for those who frequently need to take screenshots.
To capture a screenshot using Dell’s Screenshot Shortcuts, follow these simple steps:
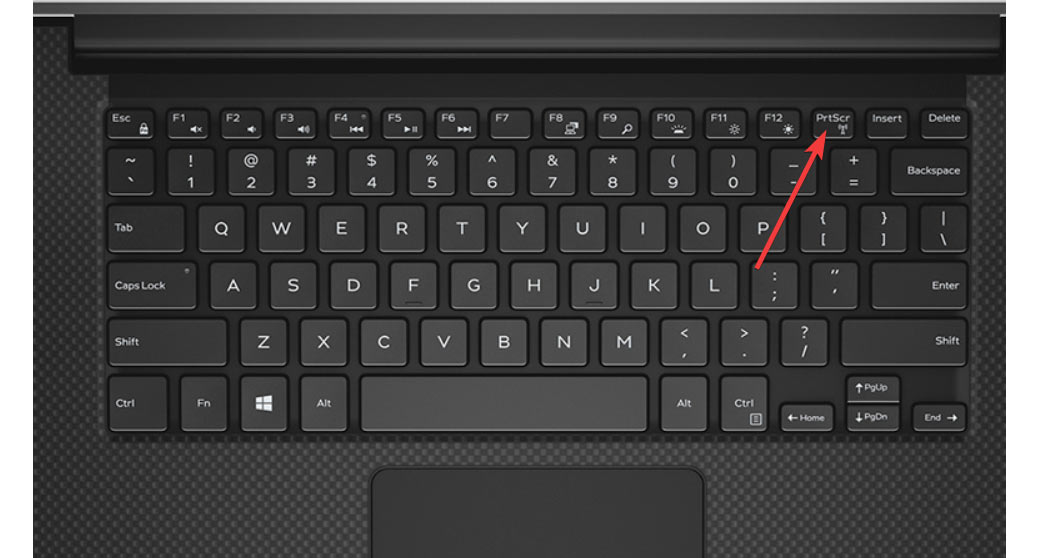
- Press the “Print Screen” key located on your keyboard. This will copy the entire screen to your clipboard.
- Open an image editor or any software of your choice (e.g., Paint, Microsoft Word, etc.).
- Paste the screenshot by pressing “Ctrl + V”.
- Save the image file in your desired location with a suitable name.
With Dell’s built-in screenshot shortcuts, you no longer need to fumble around looking for external software or hassle with complex snipping tools. It’s a quick and effortless way to capture and annotate your screen whenever you need it.
Utilizing Third-party Apps
Utilizing third-party apps can enhance your Dell laptop screenshot experience.
Exploring Snagit
Snagit is a versatile tool for capturing screenshots and editing images.
Choosing Lightshot
Lightshot is a user-friendly option for quick and precise screen captures.
Capturing The Screenshot
To capture a screenshot on your Dell laptop, simply press the “PrtScn” button. The screenshot will be saved to your clipboard, and you can paste it into an image editing program or document. Easy and quick way to capture important information or share visuals with others.
Being able to capture screenshots on your Dell laptop can be incredibly useful in a variety of situations. Whether you want to capture an important email conversation, save a funny meme, or document an error message, taking a screenshot is a quick and efficient way to capture what’s on your screen. In this article, we’ll walk you through the simple steps to capture a screenshot on your Dell laptop.
Selecting The Desired Area
Before capturing a screenshot, it’s important to determine the specific area of your screen that you want to capture. Perhaps you only need to capture a small portion of your screen or a specific window. Dell laptops offer an easy way to select the desired area for your screenshot.
To select the desired area, follow these steps:
- Identify the content or window you want to capture.
- Press the Windows key and the Shift key together.
- Press the S key to activate the screenshot tool.
- Click and drag your cursor to select the area you want to capture.
- Release the mouse button to capture the desired area.
Activating The Screenshot
Once you have selected the desired area, it’s time to activate the screenshot feature on your Dell laptop. This allows you to capture the selected area and save it as an image that you can access later.
Activating the screenshot is a simple process:
- After selecting the desired area, release the mouse button.
- Instantly, a notification will appear at the bottom right of your screen, indicating that the screenshot has been captured.
- Click on the notification to open the captured screenshot.
- Save the screenshot to your desired location on your Dell laptop.
Remember to give your screenshot a descriptive name to easily identify it later.
Capturing screenshots on your Dell laptop is a useful skill that can greatly benefit your productivity and help you save important information with ease. By following these simple steps, you’ll be able to capture and save screenshots hassle-free. Whether you’re a student, professional, or a curious individual, knowing how to capture a screenshot is a valuable skill in today’s digital world.
Saving And Editing
When it comes to capturing moments on your Dell laptop screen, it’s essential to know how to save and edit your screenshots effectively. With the built-in tools, you can quickly save and edit your screenshots without the need for external software, allowing you to customize and enhance your images as desired. In this guide, we’ll explore the simple and efficient methods for saving and editing your screenshots on a Dell laptop.
Saving The Screenshot
To save a screenshot on your Dell laptop, you can use the built-in Snipping Tool or the “Print Screen” function. With the Snipping Tool, you can select the specific area of the screen you want to capture and save it directly as an image file. Alternatively, pressing the “Print Screen” key will capture the entire screen, and then you can paste the screenshot into an image editing software or a document for saving.
Editing With Built-in Tools
Dell laptops come equipped with the Paint app, which provides basic editing functionalities for your screenshots. After capturing your screenshot, open the Paint app, and then paste the screenshot to the canvas. Here, you can crop, annotate, add text, and draw on your screenshot before saving it in the desired format. Another built-in option is the Snip & Sketch tool, allowing you to capture and edit screenshots with additional features such as a customizable pen, ruler, and highlighter tools.
Additional Tips And Tricks
Learn additional tips and tricks for taking screenshots on your Dell laptop. Capture your screen by using the keyboard shortcuts or the Snipping Tool. Utilize these methods to easily capture and save important information on your device.
Additional Tips and Tricks
When it comes to taking screenshots on your Dell laptop, there are additional tips and tricks that can enhance your experience. From customizing screenshot settings to using keyboard shortcuts for quick capture, these tips can make the process more efficient and customizable to your needs.
Customizing Screenshot Settings
Customizing the screenshot settings on your Dell laptop can help tailor the experience to your specific preferences. Many users are not aware that they can adjust the file format and save location for their screenshots. By customizing these settings, you can streamline your workflow and ensure that your screenshots are saved exactly where you need them.
Keyboard Shortcuts For Quick Capture
Utilizing keyboard shortcuts for quick capture is a time-saving technique for taking screenshots on a Dell laptop. Instead of navigating through menus to initiate a screenshot, you can simply press a combination of keys to capture the screen instantly. Familiarizing yourself with these shortcuts can significantly improve your efficiency when taking screenshots.
By customizing screenshot settings and utilizing keyboard shortcuts for quick capture, you can enhance your screenshot experience on a Dell laptop. These additional tips and tricks can make the process smoother and more tailored to your specific needs.
Credit: www.wired.com
Frequently Asked Questions For How To Screenshot On Dell Laptop
How To Screenshot On A Laptop?
To take a screenshot on a laptop, press the “Print Screen” key. Then, paste the screenshot into a program like Paint and save the image.
How Do You Screenshot On A Dell Laptop Without Prtscn?
To screenshot on a Dell laptop without PrtScn, use the Windows + Shift + S shortcut. Press the keys simultaneously, then click and drag to select the area to capture. The screenshot will be saved to the clipboard.
What Is The Key For Screenshot In Laptop?
To take a screenshot on a laptop, press the “PrtScn” key. This will capture your screen image instantly.
How Do You Screenshot On A Laptop Without The Print Screen Button?
To screenshot on a laptop without the Print Screen button, use the “Windows key + Shift + S” shortcut. This will open the Snipping Tool, allowing you to capture specific parts of the screen. Additionally, you can use third-party software like Greenshot or Lightshot for more options.
Conclusion
Capturing your screen on a Dell laptop is simple with these easy steps
